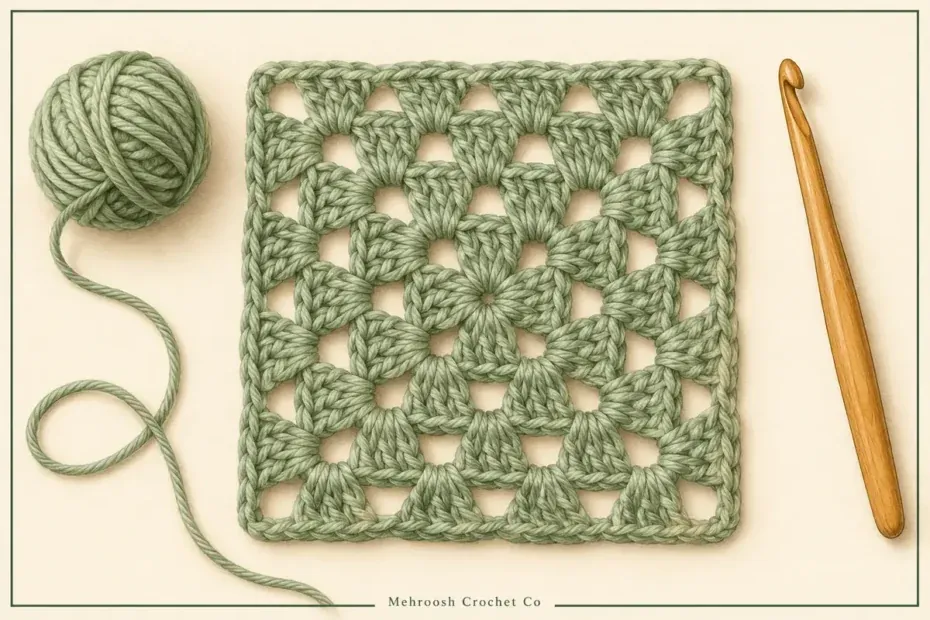
By Aqsa Shakeel | Mehroosh Crochet Co
Make a classic crochet square with groups of three double crochet stitches. This free granny square pattern starts with a small chain ring and grows over five rounds.
This easy granny square pattern includes a step-by-step guide with illustrated rounds and stitch counts to help you practise double crochet groups, chain spaces and corners.
Each round adds groups along the sides. Four corner spaces shape the square.
Choose one light yarn colour for your first try. It helps you see the stitches and follow the spaces.
Pattern at a glance: 5 rounds · US terms · CH4 ring · One colour · Beginner friendly once you know DC
Jump to Pattern ↓Need a stitch refresher? Review double crochet and the slip-stitch join before starting.
Before You Start
This granny square pattern uses US crochet terms. You will work in joined rounds, keeping the same side facing you.
You need to know how to make:
- A slip knot.
- Chain stitches.
- Slip stitches.
- Double crochet stitches.
Our beginner crochet guide explains the starting skills. Use the double crochet refresher below before working this square.
The granny square pattern has five rounds, with no separate border.
Materials
- Smooth, light-coloured medium-weight / #4 yarn.
- A crochet hook within the recommended range on the yarn label.
- Scissors.
- A blunt yarn needle.
- Optional removable stitch markers.
Use the same yarn and hook throughout this granny square pattern.
Size and Gauge
This granny square pattern has no fixed gauge or finished size. Yarn, hook size and tension will affect its width.
Measure your finished square after any blocking. If you want several matching squares, use the same materials and compare their sizes before joining.
Abbreviations
| Short form | US meaning |
|---|---|
| CH | Chain |
| DC | Double crochet |
| SL ST | Slip stitch |
| ST / STS | Stitch / stitches |
| CH-SP | Chain space |
US double crochet is called treble crochet in UK terms. Follow the US stitch names in this granny square pattern. The Craft Yarn Council abbreviation chart lists the differences.
Pattern Notes
Three Separate Stitches Make a Group
DC3 means make three complete double crochet stitches in the stated space.
Finish each DC before making the next. Do not join their tops as a DC3TOG cluster.
Corners and Sides Use Different Spaces
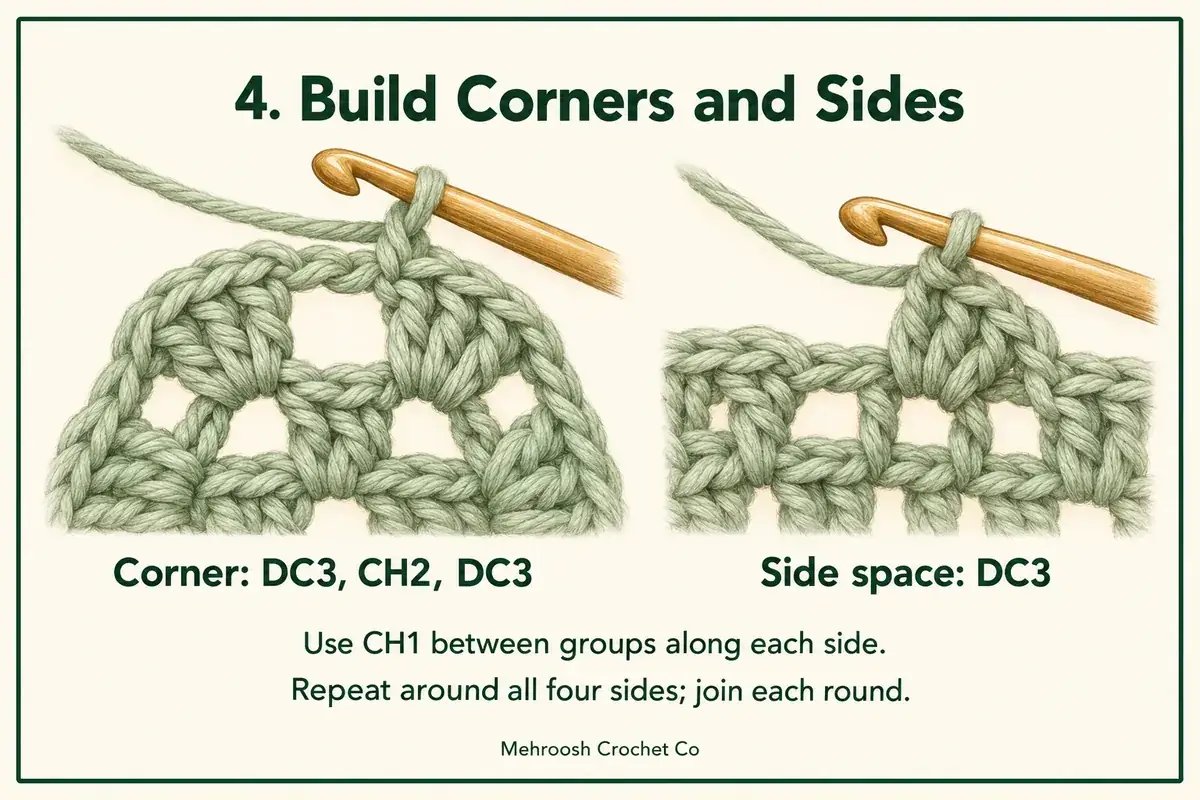
From Round 2 onward, a normal corner is:
DC3, CH2, DC3—all in one old CH2 corner space.
An old side CH1 space receives just DC3.
Make CH1 between groups along the sides. The gap within a corner uses CH2.
Starting CH3 Counts as One DC
At the start of every round:
CH3 + DC2 = one three-stitch group.
The starting CH3 counts as one DC in the totals. Do not add a third actual DC beside it.
Where to Join
Close every round with SL ST into the third chain of that round’s starting CH3.
Joining and travelling slip stitches do not count as DC.
Do not turn between rounds in this granny square pattern.
Double Crochet Refresher
- Yarn over.
- Insert the hook into the stated ring or space.
- Yarn over and bring a loop through the opening. There are three loops on the hook.
- Yarn over and pull through the first two loops. Two loops remain.
- Yarn over and pull through both remaining loops.
One live loop remains. Your DC is complete. Use this stitch for each group in the granny square pattern.
Slip Stitch Refresher
Insert the hook into the stated stitch or space. Yarn over and draw that yarn through the opening and the live loop on your hook.
Use this stitch to close a round or move to another working point.
Free Granny Square Pattern
Foundation Ring
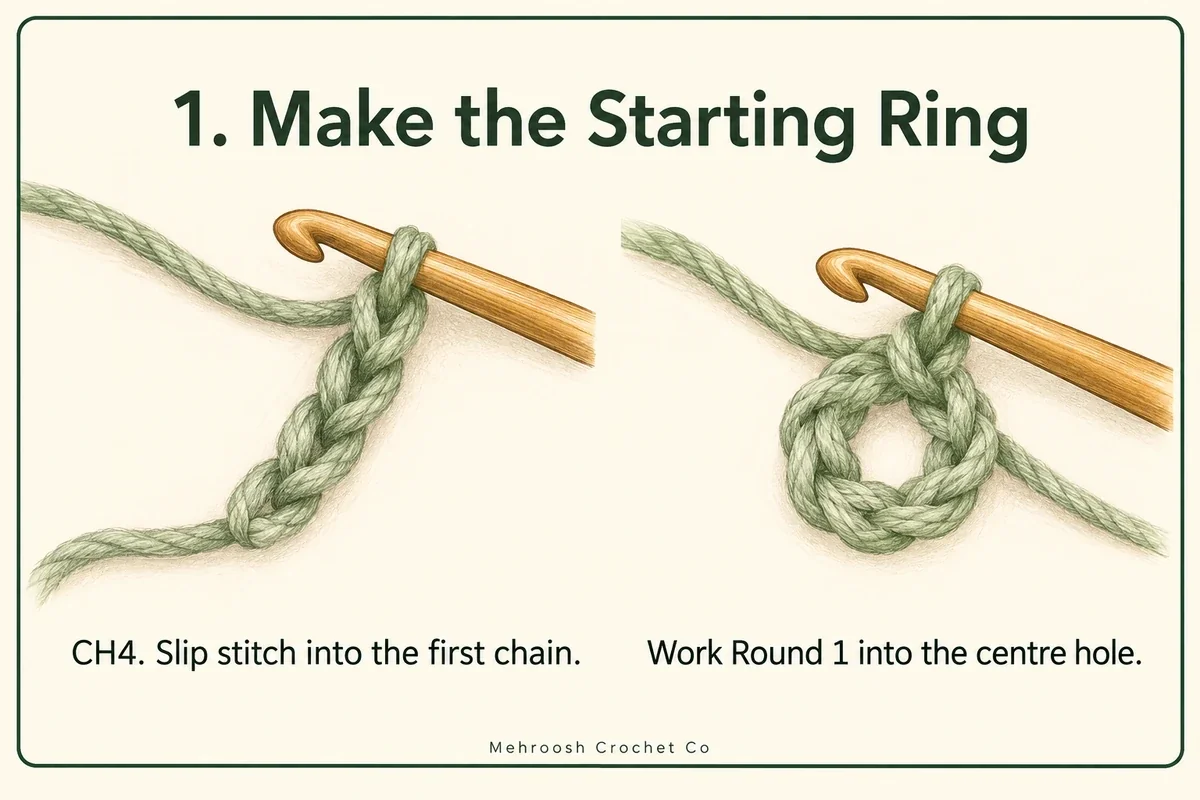
Start the granny square pattern with a slip knot, then CH4.
SL ST into the first chain made to close the ring.
Find the centre hole. All Round 1 DC stitches go through this hole, not into individual foundation chains.
Round 1
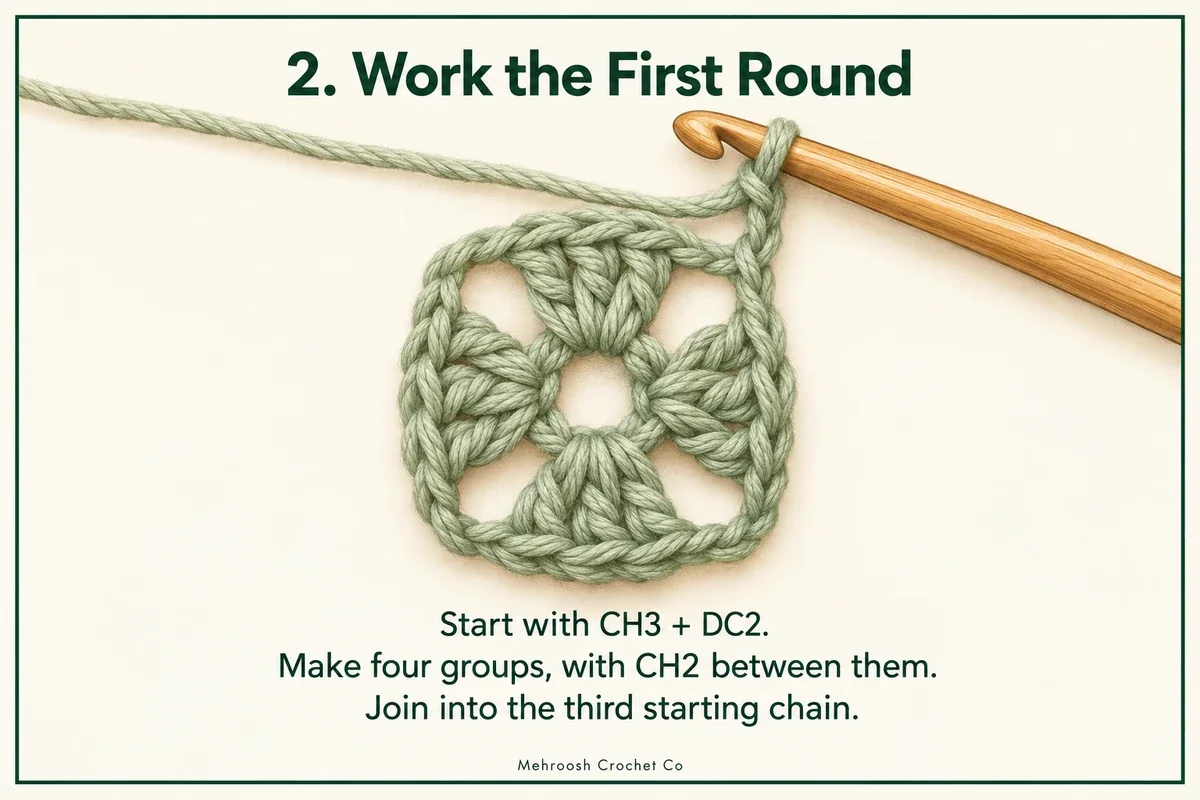
- CH3, then work DC2 into the ring.
- CH2.
- Work DC3 into the ring, CH2. Repeat this step two more times.
- SL ST into the third chain of the starting CH3.
Count: 12 DC, four three-stitch groups and four CH2 corner spaces.
There are no CH1 side spaces in this round. The small centre may not look sharply square yet.
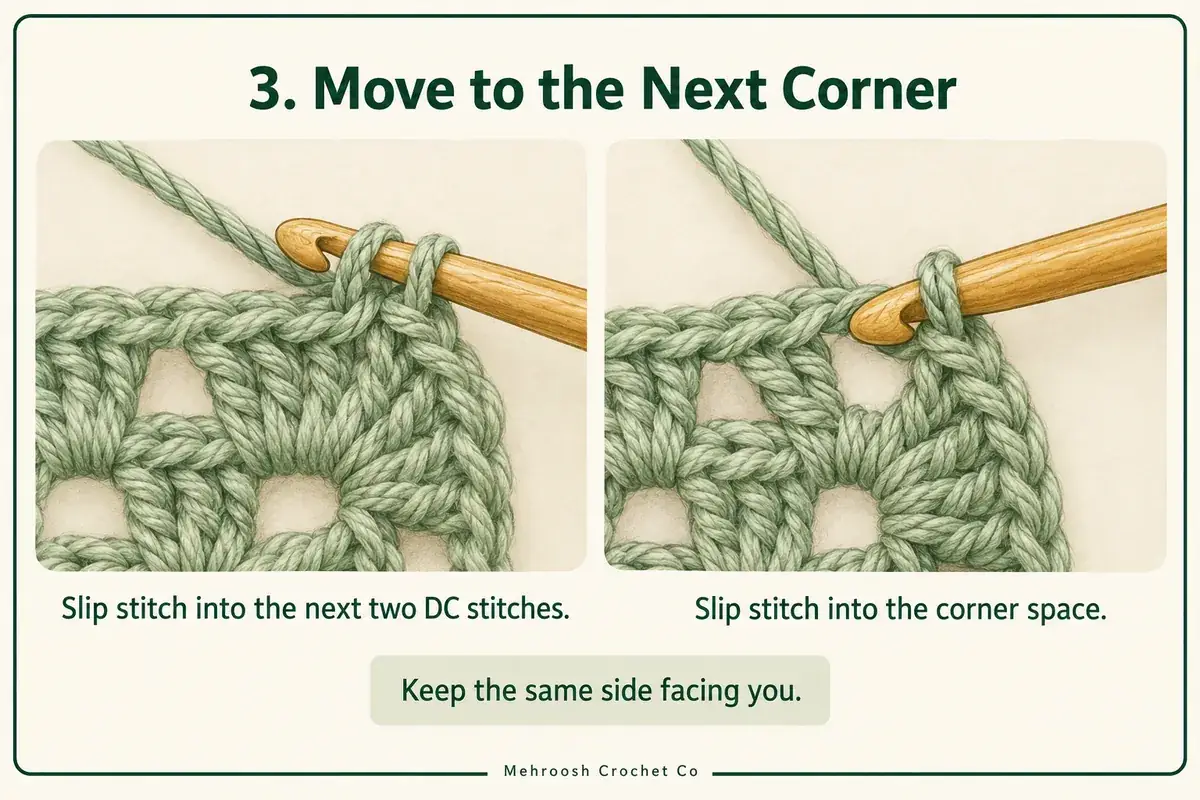
Move to the Next Corner
After joining Round 1:
- SL ST into the next DC.
- SL ST into the next DC.
- SL ST into the next CH2 corner space.
Your hook now sits in the corner space.
Use these same three travelling slip stitches before Rounds 2–5. Keep the yarn attached. Do not turn.
The DC stitches in each new round go into spaces. The travelling slip stitches go through the stated DC tops and then into the corner space.
Round 2
Move to the next corner.
- In that corner space, work CH3, DC2, CH2, DC3.
- CH1.
- In the next corner space, work DC3, CH2, DC3, then CH1.
- Repeat Step 3 two more times.
- SL ST into the third chain of the starting CH3.
Count: 24 DC, eight groups, four CH1 side spaces and four CH2 corners.
Each corner has two groups. One CH1 gap runs between each pair of corners.
Round 3
Move to the next corner.
- In that corner space, work CH3, DC2, CH2, DC3.
- CH1, work DC3 into the next side CH1 space, then CH1.
- In the next corner space, work DC3, CH2, DC3, then CH1.
- Work DC3 into the next side CH1 space, then CH1.
- Repeat Steps 3–4 two more times.
- SL ST into the third chain of the starting CH3.
Count: 36 DC, 12 groups, eight CH1 side spaces and four CH2 corners.
You have worked one old side space along each side.
Round 4
Move to the next corner.
- In that corner space, work CH3, DC2, CH2, DC3.
- CH1.
- In each of the next two side CH1 spaces, work DC3 followed by CH1.
- In the next corner space, work DC3, CH2, DC3, then CH1.
- In each of the next two side CH1 spaces, work DC3 followed by CH1.
- Repeat Steps 4–5 two more times.
- SL ST into the third chain of the starting CH3.
Count: 48 DC, 16 groups, 12 CH1 side spaces and four CH2 corners.
Round 5
Move to the next corner.
- In that corner space, work CH3, DC2, CH2, DC3.
- CH1.
- In each of the next three side CH1 spaces, work DC3 followed by CH1.
- In the next corner space, work DC3, CH2, DC3, then CH1.
- In each of the next three side CH1 spaces, work DC3 followed by CH1.
- Repeat Steps 4–5 two more times.
- SL ST into the third chain of the starting CH3.
Count: 60 DC, 20 groups, 16 CH1 side spaces and four CH2 corners.
Stop here for the five-round square. Fasten off without travelling to another corner.
If you want a larger square, keep the yarn attached and follow the extension below.
Round Count Table
The DC totals include the starting CH3 as one DC. Chain spaces are listed separately.
| Round | DC total | Three-stitch groups | CH1 side spaces | CH2 corners |
|---|---|---|---|---|
| 1 | 12 | 4 | 0 | 4 |
| 2 | 24 | 8 | 4 | 4 |
| 3 | 36 | 12 | 8 | 4 |
| 4 | 48 | 16 | 12 | 4 |
| 5 | 60 | 20 | 16 | 4 |
In this granny square pattern, each new round adds 12 DC, four groups and four side spaces. There are always four corner spaces.
Finish the Square
Cut the yarn, leaving a tail about 15 cm / 6 inches long.
Pull the cut end fully through the live loop. Snug it gently.
Thread the tail through a yarn needle. Weave through several stitches inside the fabric. Change direction through a nearby path, keeping the stitches relaxed.
Trim the extra yarn. Hide the starting tail in the same way.
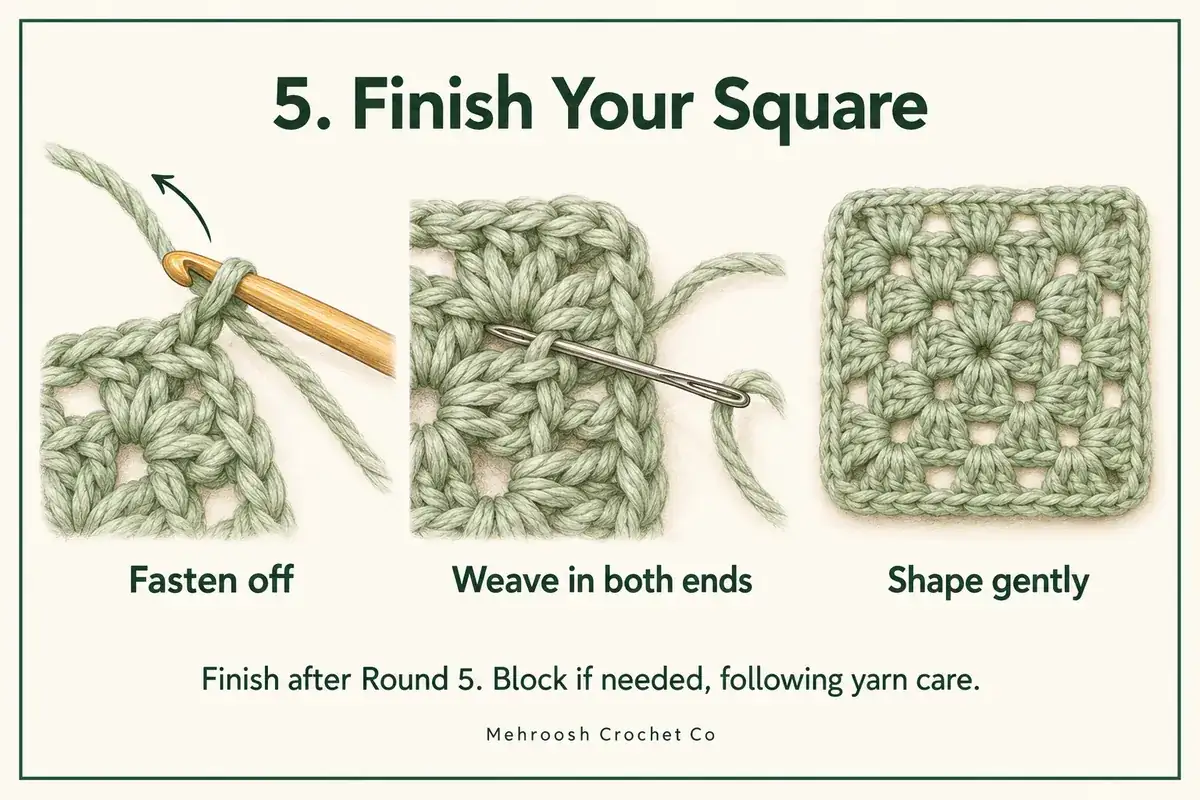
Blocking
Smooth the square on a flat surface.
If it needs blocking, follow the yarn’s care instructions. Shape the corners gently and let the fabric dry fully before measuring.
Check the granny square pattern counts first. Blocking will not replace a missed group or remove an extra corner.
Extend the Granny Square Pattern
To work Round 6, move to the next corner after joining Round 5.
- In that corner, work CH3, DC2, CH2, DC3, then CH1.
- In each of the next four side CH1 spaces, work DC3 followed by CH1.
- In the next corner, work DC3, CH2, DC3, then CH1.
- In each of the next four side CH1 spaces, work DC3 followed by CH1.
- Repeat Steps 3–4 two more times.
- SL ST into the third chain of the starting CH3.
Round 6 count: 72 DC, 24 groups, 20 CH1 side spaces and four CH2 corners.
Further Rounds
Use the same route for each new round:
- Work the starting corner once.
- Work across the first side.
- Complete the next corner and side three times in total.
- Join to the starting CH3.
Do not work into the starting corner again before joining.
The number of old side spaces to work into increases by one each round:
| New round | Old side CH1 spaces to work into per side |
|---|---|
| 6 | 4 |
| 7 | 5 |
| 8 | 6 |
For Round n:
- Work into n − 2 old side spaces per side.
- Finished DC total = 12 × n.
- Finished group total = 4 × n.
- Finished CH1 side spaces = 4 × (n − 1).
- Finished CH2 corners = four.
This version keeps the same side facing throughout. Check the shape as it grows; larger squares may develop a twist. Turning between rounds is a separate method and would need different starting-position instructions.
Common Mistakes
More Than Four Corners
From Round 2 onward, only the four old CH2 corner spaces receive DC3, CH2, DC3.
Side CH1 spaces receive one DC3 group each. Mark the corners if you lose track of them.
Four Stitches in the Starting Group
Count the CH3 as your first DC.
Only two actual DC stitches go beside it. Together, they make a group of three.
Unequal Sides
When following this granny square pattern, compare the groups along all four sides.
A missed space or extra group can change one side’s length. Undo the work to the mistake and correct it before adding more rounds.
An Awkward Round Join
Find the starting CH3 and join into its third chain.
In Rounds 2 onward, make the final CH1 before the joining slip stitch.
Cupping or Rippling
Check that each group has three stitches, each side gap uses CH1, and each corner uses CH2.
If the counts are right, try adjusting your tension or hook within the yarn’s recommended range. Compare a fresh sample before stretching the fabric into shape.
Questions About the Pattern
Can a Beginner Make This Square?
Yes. This granny square pattern is suitable once you can work chains, slip stitches and double crochet. Take one round at a time and check its totals.
Can I Use Cotton?
Yes. Match the hook to the cotton yarn. The finished size and feel may differ from a square made with another fibre.
Can I Make Fewer Rounds?
Yes. Join and fasten off after any complete round.
Do I Need a Magic Ring?
No. This pattern uses a CH4 ring.
What Can I Make with Several Squares?
You can use squares in blankets, cushions or bags. Those projects also need a layout, joining instructions and any extra finishing.
This granny square pattern covers the square itself.
Keep a Record of Your Square
Write down the yarn, hook and finished width. Keep those notes with your granny square pattern so you can make another square to match.
For a larger flat project made from matching squares, weigh and measure a finished sample before using the yarn quantity calculator as an area-based planning estimate. Allow separately for joining, borders and finishing. Use the yarn cost calculator when you are ready to compare whole-ball purchases.
Our guide to reading crochet patterns explains written repeats. Visit the tutorials hub for related lessons.
Pattern written by Aqsa Shakeel for Mehroosh Crochet Co.
Plan a Set of Matching Squares
One finished sample gives you more useful planning information than a guessed size. Before repeating this granny square pattern, finish the first square completely, follow the yarn’s care instructions and measure it when dry. Record its width in both directions without stretching it. Keep that sample beside later squares so you can compare the fabric as well as the measurements.
Record the details that make a repeat possible
Write the yarn name, colour, hook diameter and completed round count on a project note. If you change colour between rounds, record the order as well. A photograph can help identify the arrangement, but the written note should explain the starting point and round sequence. Keep any personal change separate from the original instructions so you can reproduce the same version later.
For this granny square pattern, include whether you stopped after five rounds or followed the extension. Two squares with different round counts should not be treated as matching motifs simply because their colours are alike. Confirm the stitch groups and corner spaces before comparing size. An incorrectly placed corner or an extra group needs correction before joining.
Compare motifs before making a large batch
Make a second square using the recorded materials and method. Lay it over the first with the corners aligned, then compare all four sides. If one edge is noticeably different, check the counts and tension. Blocking can help settle an otherwise sound square, but pulling one piece firmly to match another can disguise a construction difference that returns later.
The granny square pattern does not specify one finished measurement. Your own completed sample supplies that information. Avoid assigning a blanket or bag size from the photograph, and do not assume that another maker’s five-round square will match yours. A change of yarn, hook or tension can change the result even when the written counts are identical.
Plan the arrangement separately from the motif
Sketch the proposed rows and columns before making every square. A layout of three motifs across and four motifs down needs twelve squares. That arithmetic gives a motif quantity, not a complete finished blanket measurement. Joining, spacing and an outer border may add dimensions, while some joins draw neighbouring edges together.
This granny square pattern teaches the square itself. Select joining instructions suitable for your project and compare how the join sits on a small sample before committing to a full layout. Check that the chosen arrangement leaves the fabric flexible enough for its intended use. Keep a separate note of any border and joining yarn rather than treating it as part of each square’s five rounds.
Allocate yarn for the full set
Weigh a finished representative square if your scale can measure it reliably. Multiply that sample weight by the planned number of matching motifs as an initial fabric estimate. Allow separately for differences between colours, joining, borders and finishing. If you weigh several squares together, divide the combined weight by their number before scaling the result.
When using the granny square pattern in several colours, keep the actual yarn quantities for each colour separate. A large total amount of yarn does not ensure enough of the shade used for every final round. Record supplies alongside the layout and check availability before making a batch. The linked yarn-planning tools can help organise the purchase, while your own sample remains the reference for the fabric.