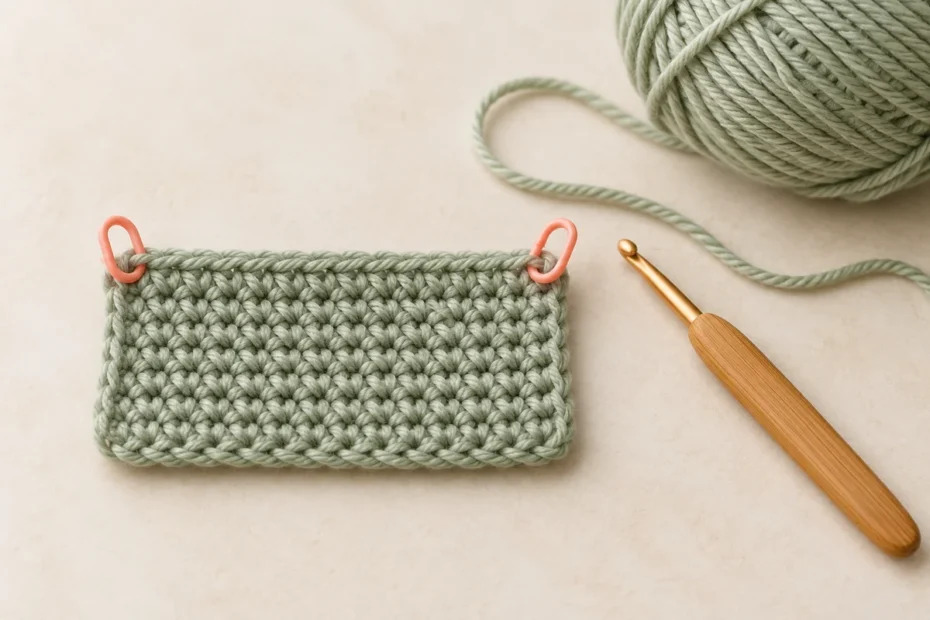
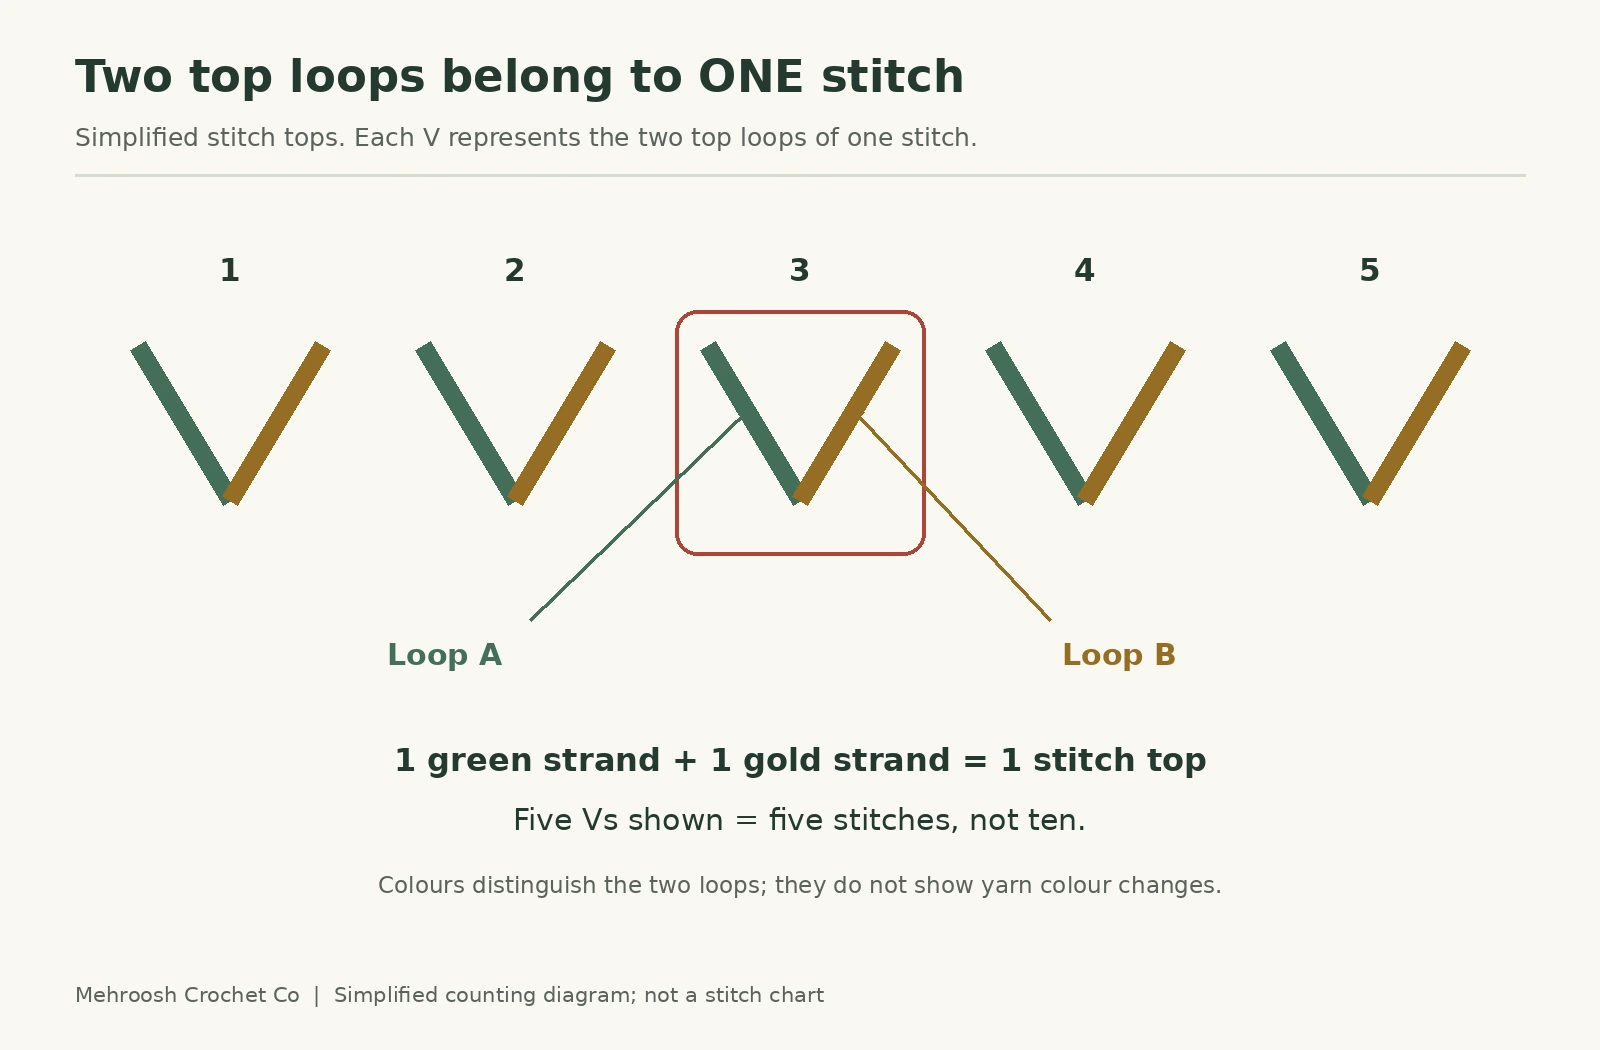
If you are learning how to count crochet stitches, start by examining the upper edge of a plain row. Find the small pairs of loops that look like a line of Vs. Each complete pair belongs to one stitch, so move across the edge counting each pair once. Leave the active loop on your hook out of the total.
Learning how to count crochet stitches also means recognising where the row begins and ends. Practise on a short swatch, marking its two end stitches so you can find them again after turning.
Quick stitch-count check for a completed plain SC row:
- Find the first and last stitch of the row you just finished.
- Count each complete top V once, including both edge stitches.
- Leave out the live hook loop and, for this practice sample, the turning chain.
- Compare your total with the stitch count given in the pattern.
Terminology: The examples below use US crochet terms. SC means single crochet; its UK equivalent is double crochet.
How to Count Crochet Stitches by Their Tops
To practise how to count crochet stitches, use a light-coloured yarn with little surface fuzz. Fuzzy fibres, deep colours and strong colour changes can make neighbouring stitches blend together.
To learn how to count crochet stitches by touch and sight, rest the work on a table with the hook still in its active loop. Tip the upper edge towards the light until you can distinguish the individual stitch tops.
A spare hook can serve as a pointer. Touch one complete V, say its number, then move to the next. Avoid pushing the pointer through every opening; some visible gaps lie between stitches.
On an ordinary single crochet stitch, the two strands of the V are its front and back loops. They are parts of the same stitch, not separate stitches to count.
If you need help forming the fabric first, our beginner crochet lesson explains the starting chain and first rows.
How to Count Crochet Stitches in a Foundation Chain
Before practising how to count crochet stitches in rows, check your foundation while it is still a chain. Once stitches cover it, finding an extra or missing link takes more effort.
Lay the starting chain across your fingers without pulling it taut. Find the completed chain link immediately beneath the loop held by the hook. That link is chain one. Continue along the chain towards its starting end.
Exclude both the active loop and the slip knot.
Suppose you have made 11 chains. A careful recount should identify 11 separate links between the hook and the knot. The loop wrapped around the hook does not make the total 12.
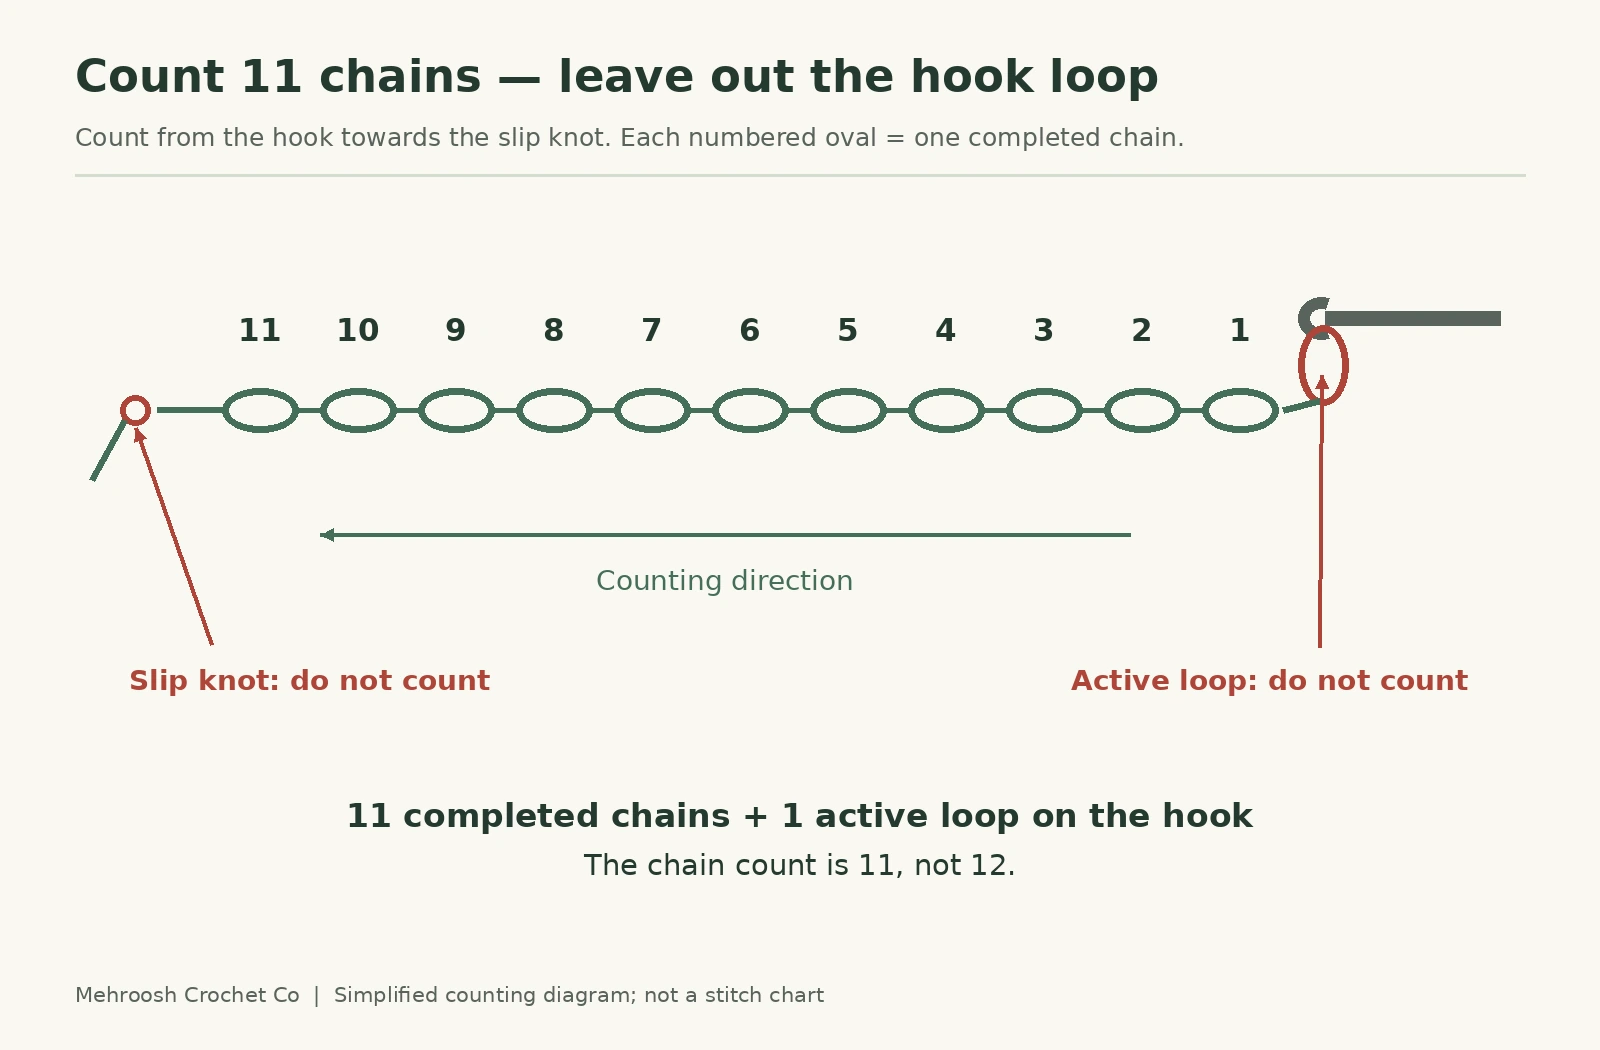
An instruction such as “begin in the second chain from the hook” uses the same counting direction. Pass over the nearest completed link and work into the following one.
The Crochet Guild of America’s foundation-chain illustrations provide a useful reference if the links are difficult to recognise.
How to Count Crochet Stitches on a Small Sample
Use this exercise to practise how to count crochet stitches while keeping a fixed total. You need suitable yarn, its matching hook and two removable stitch markers.
For this sample, the turning chain supplies height only. It is never included in the single crochet total.
Build a Ten-Stitch Row
Make 11 chains.
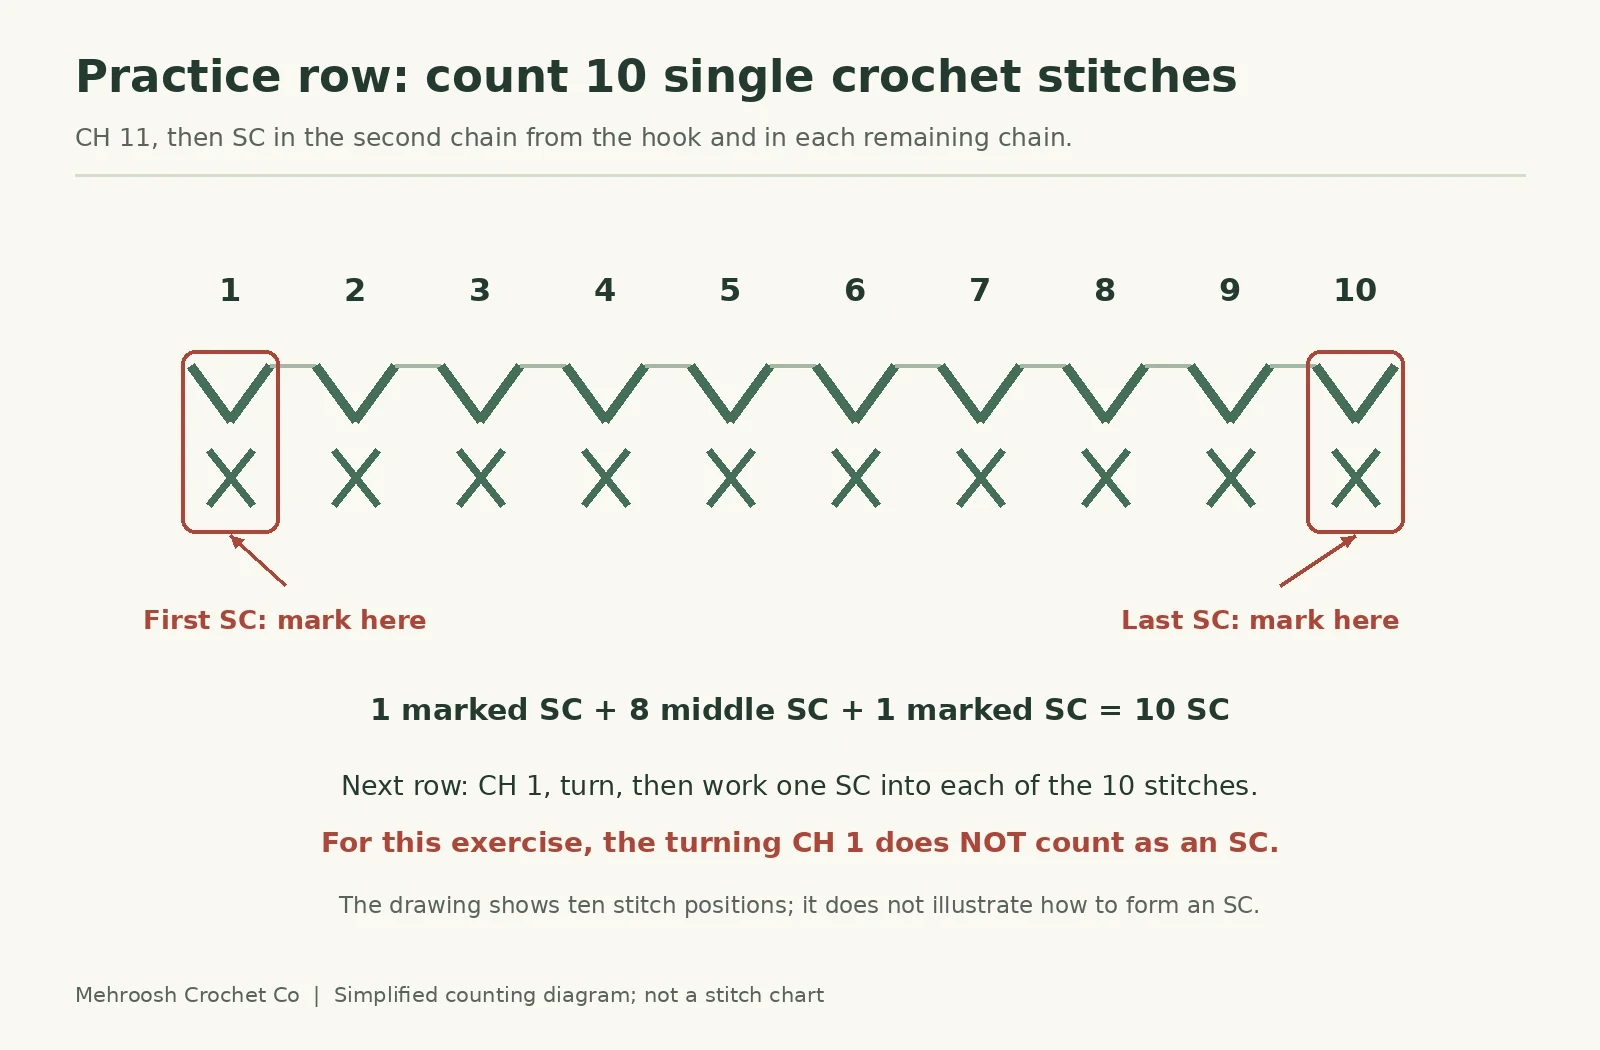
Beginning in the second chain away from the hook, make one single crochet in every remaining chain. There are ten available chain positions, giving you 10 SC.
Pause before turning. Follow the upper edge from one end to the other and identify the ten completed stitch tops.
Clip one marker through the top of the first SC and the other through the top of the final SC. Include both strands of each marked stitch so the location is easy to find again.
Your marked boundaries now enclose eight other stitches:
First marked stitch + eight middle stitches + final marked stitch = 10 SC.
Carry the Markers Into the Next Row
Make one chain, then turn the sample.
The marked stitch nearest your hook is the first stitch to work into. Remove its marker, make an SC there, and place the marker through the top of that new SC.
Continue across the row. At the opposite edge, remove the remaining marker and work an SC into its stitch. Mark the new final SC.
Count again. The result should still be 10 SC.
Continue until the piece has four completed rows, checking each row before starting another.
| Part of the exercise | Number to check |
|---|---|
| Chains made before Row 1 | 11 |
| SC after completing Row 1 | 10 |
| SC in Rows 2, 3 and 4 | 10 per row |
| Turning CH 1 | Not included in the SC count |
The markers move upwards as the sample grows. Leaving them attached to an older row would stop them from identifying the edge you are currently working.
Counting Partway Through a Row
When practising how to count crochet stitches, finish the row before checking its new stitch tops. Partway across, some visible tops belong to your new row and others belong to the previous row.
For example, after working four SC in the next row of this sample, you have four new stitches made and six previous-row stitches still waiting to be worked. Record that as “4 of 10 stitches worked.” Do not count a new stitch and the old stitch underneath it as two stitches in the same row.
Check Whether the Beginning Chain Is Included
This exercise in how to count crochet stitches uses one clear rule, but another pattern may use a different convention.
Look for a note explaining whether its beginning chain represents a stitch. That decision affects the total and where the next stitch belongs.
Consider these two instructions:
- “Beginning CH 3 counts as a DC.” Treat that chain group as one double crochet in the row total.
- “Beginning CH 3 does not count.” Leave the chain group out when counting the completed stitches.
Three chain links can therefore stand for one counted DC. The number of chains and the number of stitches represented are different measurements.
When a beginning chain represents the first stitch, the final stitch of the following row commonly goes into its top chain. When the beginning chain is excluded, follow the pattern’s directions for the actual edge stitch.
Avoid deciding from chain height alone. Read the notes before making the first row.
The Craft Yarn Council’s pattern-reading examples demonstrate conventional chain treatment. Our guide to understanding crochet pattern instructions explains how to apply notes and repeats to your own project.
How to Count Crochet Stitches in Rounds
When learning how to count crochet stitches in rounds, establish a starting point because there is no obvious straight edge. Use that starting point to check the number of stitches once around.
For continuous single crochet rounds, place a marker through the top of the first completed SC of the round. Leave it there while you work the rest of that round.
When the round is finished, count the marked stitch as one and follow the tops of the stitches made in that round. Stop at the last stitch before the marker; do not count the marked stitch twice. Compare the result with the pattern before beginning the next round.
To start the following round, remove the marker, work into that first stitch as directed by the pattern, and place the marker in the first new stitch you complete.
Joined rounds need closer attention to the written instructions. The joining slip stitch and starting chain may be excluded from the stated total. However, a slip stitch deliberately used within the stitch pattern can be a counted stitch.
Keep your progress note precise. “Round 5 finished; 24 stitches” records two separate facts: the completed round number and its stitch total.
Separate Stitches, Groups and Open Spaces
Several stitches can share one insertion point. If you make three DC into a corner space, you have produced three DC, even though the hook entered the same opening each time.
A decrease reverses that relationship. For instance, SC2TOG (single crochet two together) combines two positions from the previous row into one completed stitch.
Check How Increases and Decreases Change the Total
The examples below each begin with a plain row of 10 SC. They assume every previous-row stitch is used as described, with no other increases, decreases or chain spaces.
| Next-row instruction | Completed total |
|---|---|
| Work one SC into each of the 10 stitches. | 10 SC |
| Work two SC into the first stitch, then one SC into each of the remaining nine stitches. | 11 SC: 2 + 9 |
| SC2TOG over the first two stitches, then work one SC into each of the remaining eight stitches. | 9 SC: 1 + 8 |
Count the completed stitch tops, not the number of times you inserted the hook. An increase makes extra stitch tops; a decrease joins previous-row positions into fewer completed stitches.
Special textures require the pattern’s definition. A bobble may involve several unfinished stitch movements while contributing only one stitch to the finished count.
Open patterns can also list spaces separately. If the instructions report “12 DC and four CH-2 spaces,” check the DC total and the four openings as separate categories. Do not turn those openings into four additional DC.
Our granny square project offers a useful next exercise because its round totals distinguish stitch groups from corner spaces.
How to Count Crochet Stitches When the Total Is Wrong
Knowing how to count crochet stitches includes stopping for a careful recount before making another stitch. Check that you are following one row, including both edges, and applying the correct beginning-chain rule.
If the total remains wrong, inspect the fabric.
| What you notice | Where to look |
|---|---|
| One stitch fewer than expected | An unworked edge stitch or a skipped position |
| One stitch more than expected | Two stitches sharing a position unintentionally, or a stitch added in an extra gap |
| Correct total with a visible hole | A missed position elsewhere may have been balanced by an accidental increase |
| Correct total but changing width | Compare tension, stitch height and hook size |
A number alone cannot confirm correct placement. Missing one stitch and adding another elsewhere leaves the same total, but the fabric may still show both mistakes.
For an error in the row you are making, undo enough stitches to reach it and work that section again. Check the repaired row before moving on.
Adding a spare stitch at the far edge might restore the number while leaving the original problem untouched.
How to Count Crochet Stitches Across Long Rows
Long rows are easier to manage when you can restart from a known point.
On a plain row of 43 stitches, clip removable counting markers through the tops of stitches 10, 20, 30 and 40 as you count. Each marker identifies the last stitch of a ten-stitch section.
Count stitches 1–10 in the first section. For the next section, start at the stitch after the first marker and count through the stitch holding the second marker. Continue in the same way, then count the final three stitches after the marker at stitch 40.
Check: 10 + 10 + 10 + 10 + 3 = 43 stitches. Include each marked stitch once, at the end of its section. Do not count it again at the start of the next section.
Choose a different marker colour for the beginning of a round or a special instruction. Counting markers should remain distinct from markers identifying a corner, increase or colour change.
Before putting the project away, note what has actually been completed. “Row 9, first 20 stitches worked” gives you a clear place to resume.
Keep your row tally separate from the stitches across each row. Our crochet row counter saves completed rows for named projects in this browser; keep a separate note if you need a backup on another device.
Questions That Often Come Up
What Is the Difference Between Counting Stitches and Counting Rows?
A stitch count tells you how many stitches are in one row or round. A row count tells you how many rows you have completed. This practice sample has 10 SC across each row and four completed rows. Keep a separate tally as you finish each row; the starting chain does not count as a completed SC row.
Can I count the loops on the hook?
For the standard single crochet examples here, the loop remaining after a completed stitch is the working loop. It is excluded from the stitch total. Loops temporarily on the hook during stitch formation are not a finished-row count either.
Do back-loop-only stitches count differently?
No. Working into the back loop changes the insertion point. A plain row with one stitch worked into each existing stitch still has the same total unless the instructions add increases or decreases.
Is the method different for left-handed crochet?
The working direction may be mirrored, but each completed stitch is counted once. Begin at a boundary you can identify and use markers to keep that boundary clear.
Can a row counter check my stitches?
A row counter records how many rows or rounds you have completed. It cannot tell whether a particular row contains the expected number of stitches.
Should a narrower piece always have fewer stitches?
No. Tighter tension can reduce its width without changing the count. Check both the stitch total and the way the yarn is being worked before deciding what needs correction.
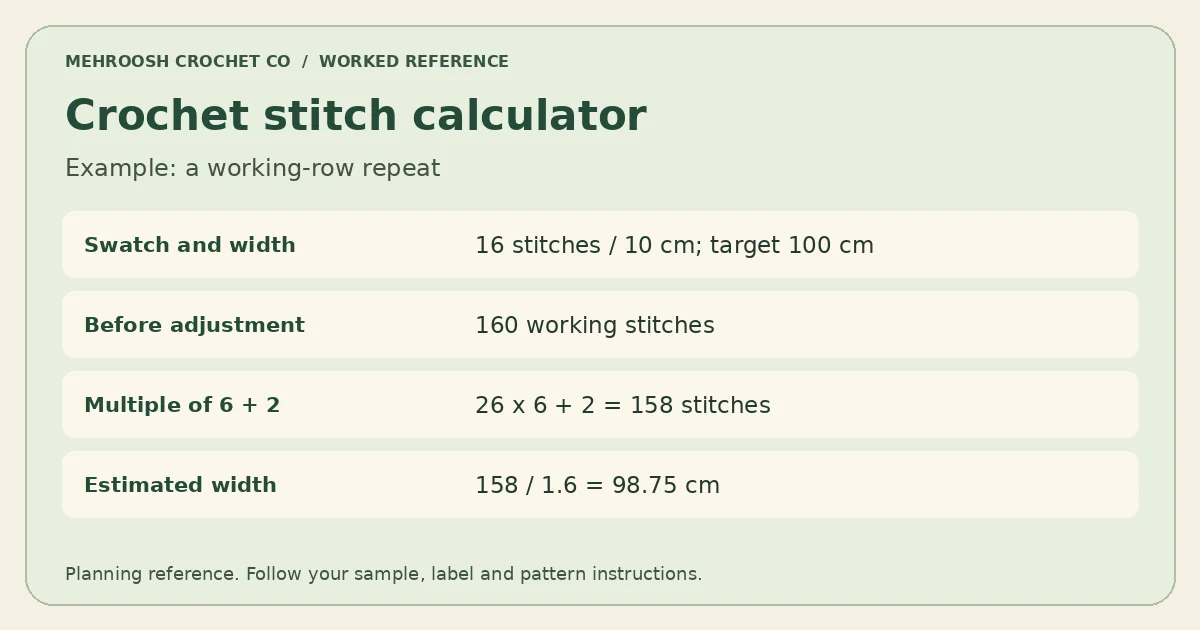
After counting stitches across a measured swatch, use the crochet stitch calculator to estimate a working-row count for your chosen width. It uses your gauge and cannot check the stitches in a photograph or a finished row.
Take the Counting Habit Into Your Next Project
Practise how to count crochet stitches on the ten-stitch sample until you can locate both edges without guessing. Then apply the same checks to a pattern: identify the boundaries, read its chain convention and compare your total at a useful stopping point.
For another skill to practise alongside counting, browse our crochet tutorials and choose the lesson that matches your next project.
Tools for Your Next Planning Step
Use these references with your own measurements and the written instructions above.
 Crochet Stitch Calculator