Learn how to crochet by making a small single crochet practice swatch. This illustrated beginner guide takes you through choosing supplies, making a slip knot, chaining, working your first stitch, turning rows and securing the yarn ends.
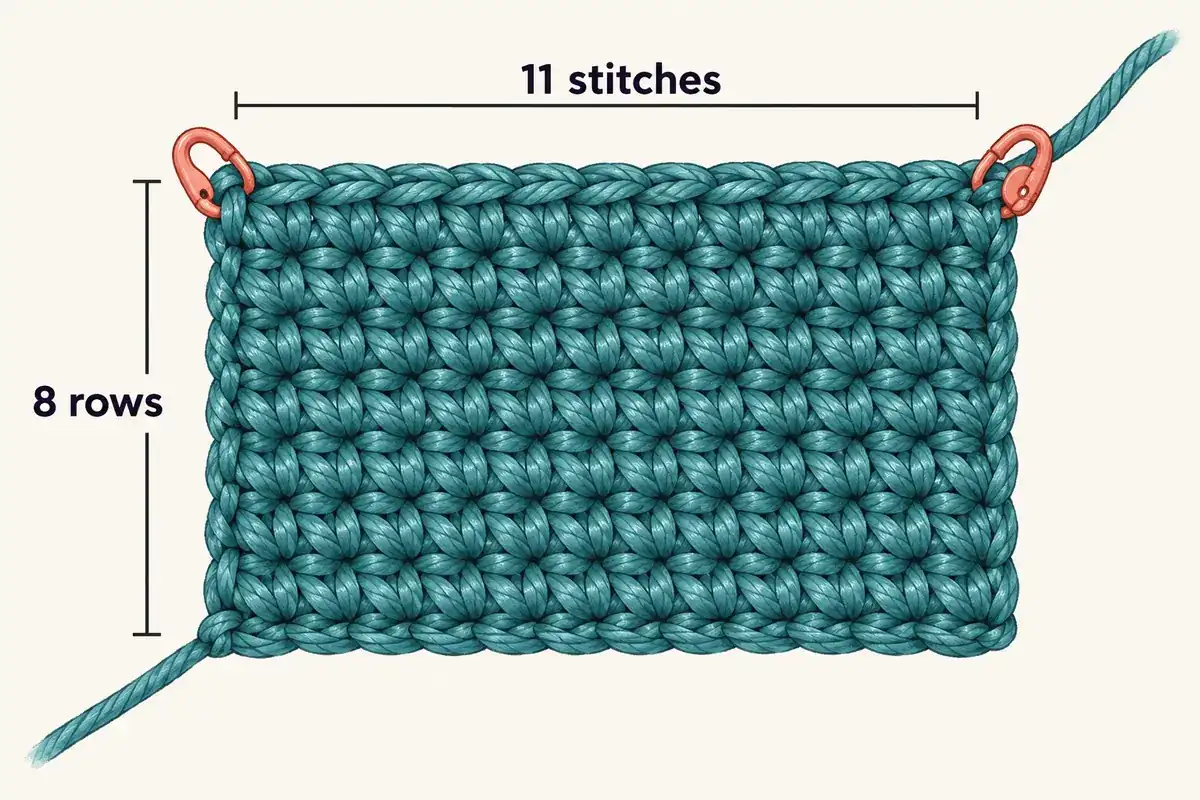
You will start with 12 chains and make eight rows of 11 single crochet stitches. The instructions use US crochet terms and describe right-handed work. Follow each step at your own pace, checking your stitch count before moving on.
Your practice goal: 11 single crochet stitches in each of eight rows. Your first rows may look uneven. Pause, check the count, and work at your own pace.
Choose Yarn for Learning How to Crochet
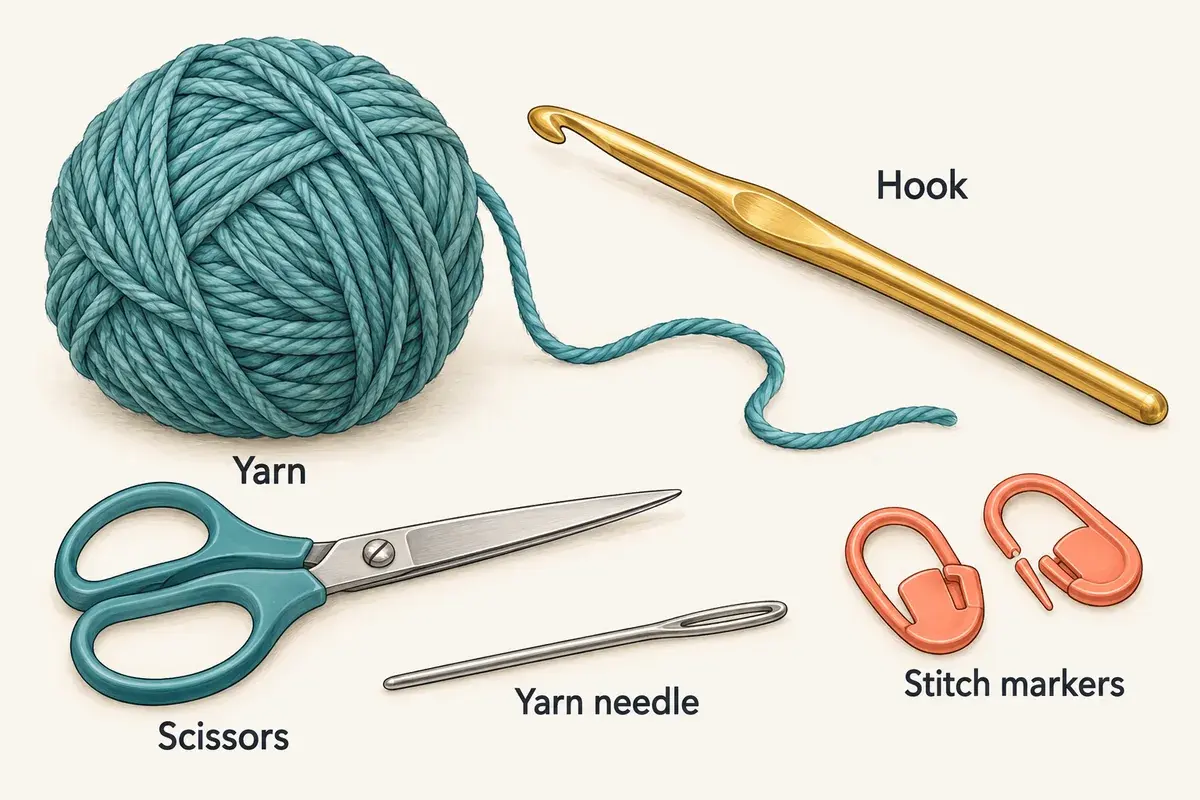
Look for smooth yarn in a pale shade. Cream, light blue or soft pink can make the loops easy to spot. Save fuzzy yarn for a later project.
Medium-weight yarn, labelled #4, is a practical choice when learning how to crochet. Choose a hook within the range printed on the yarn label.
You will also need:
- Scissors.
- A blunt yarn needle.
- Two stitch markers that open.
Keep the yarn ball close enough that the strand can feed freely. Pull out a little spare yarn if the ball keeps tugging at your hand.
If your hook carries a US letter or a traditional UK number, compare it with the crochet hook size converter. Use the millimetre diameter marked on the hook as the final reference, because letter and number labels can vary between brands.
How to Crochet: Understand the Basic Terms
Before you begin, identify the two yarn ends. The working yarn leads to the ball; the tail is the short, loose end. Keeping them separate helps you follow how to crochet each loop without accidentally using the tail.
When a step says yarn over, bring the working strand across the hook from back to front. Catch it with the curved tip.
| Pattern term | Short form |
|---|---|
| Chain | ch |
| Single crochet | sc |
| Stitch | st |
| Stitches | sts |
In UK patterns, the stitch called US single crochet has the name double crochet. The Craft Yarn Council term chart helps you check the difference.
Use our US to UK crochet terms converter to compare common stitch names before following another pattern.
How to Crochet Comfortably: Hook Grip and Yarn Tension

Pick up the hook with the hand you use to write.
Try resting it between your fingers like a pencil. You can also place your palm over it, with the handle resting inside your hand.
As you learn how to crochet, choose the grip that feels easier to control. Keep your wrist relaxed.
Your other hand holds the fabric and guides the yarn. Let the strand run over your index finger while your thumb and another finger hold the work below the hook.
Avoid squeezing the yarn so hard that it cannot move. It needs to feed through your fingers as each stitch forms.
These instructions explain how to crochet right-handed. Left-handed learners can reverse the hand positions and mirror the movements.
How to Make a Slip Knot

Leave roughly six inches of loose yarn for sewing in later.
Lay part of the working strand over the tail to make a ring. Pinch the point where the strands cross.
Reach through the ring and lift a small fold of the strand that leads to the ball. Bring that fold through, leaving the rest of the yarn outside.
Slide the hook into the new loop. Draw the yarn ends gently until a knot sits beneath it.
Test the fit. The loop should move along the wide, straight part of the hook without much force.
The slip knot holds your starting loop in place. When learning how to crochet, remember that neither this knot nor the live loop counts as a chain.
How to Crochet a Foundation Chain

Hold the knot with your yarn hand so it stays steady.
Sweep the hook under the working strand and catch the yarn. Turn the hook slightly so its tip can pass through the loop without snagging.
Draw the caught strand through. A small V now hangs below the hook.
That V is your first chain.
Keep making the same move. As the chain grows, shift your holding fingers up towards the hook. Holding the work close gives you more control.
Stop when you reach 12 chains.
Check the Starting Edge
Set the chain against your finger and find each V. Count from the hook towards the knot.
Leave the live loop on the hook out of the total. Leave the knot out too.
If the V shapes are hard to separate, loosen your grip for the next try. You will need enough space to place the hook inside each chain.
How to Crochet Your First Single Crochet Stitch

Look at the chain with its V-shaped front facing you. Do not count the loop on your hook. The chain directly beneath that loop is the first chain; the next one is the second chain.
Skip the first chain. For this starting row, use the upper strand of each chain’s V. Work your first single crochet as follows:
- Insert your hook under the upper strand of the second chain from the hook.
- Yarn over by catching the working yarn from back to front.
- Pull the caught yarn through the chain opening. Pause here: you should have two loops on your hook.
- Yarn over again and pull through both loops on the hook.
- Check that one loop remains on your hook. You have completed one single crochet stitch.
Clip a stitch marker through both top loops of the single crochet stitch you just completed. Leave the live loop on your hook unmarked.
Repeat these five steps in the next chain and in each remaining chain, working toward the tail. Use the same insertion method throughout this starting row.
Your first row contains 11 single crochet stitches. One of the 12 starting chains was skipped.
Place the second marker through both top loops of the last stitch in the row. Your first and last stitches are now marked, making the row edges easier to find.
Starting chains versus later rows: The one-strand insertion above is for this foundation chain. From row two onward, work under both top loops of each single crochet stitch.
Find the Stitch Tops
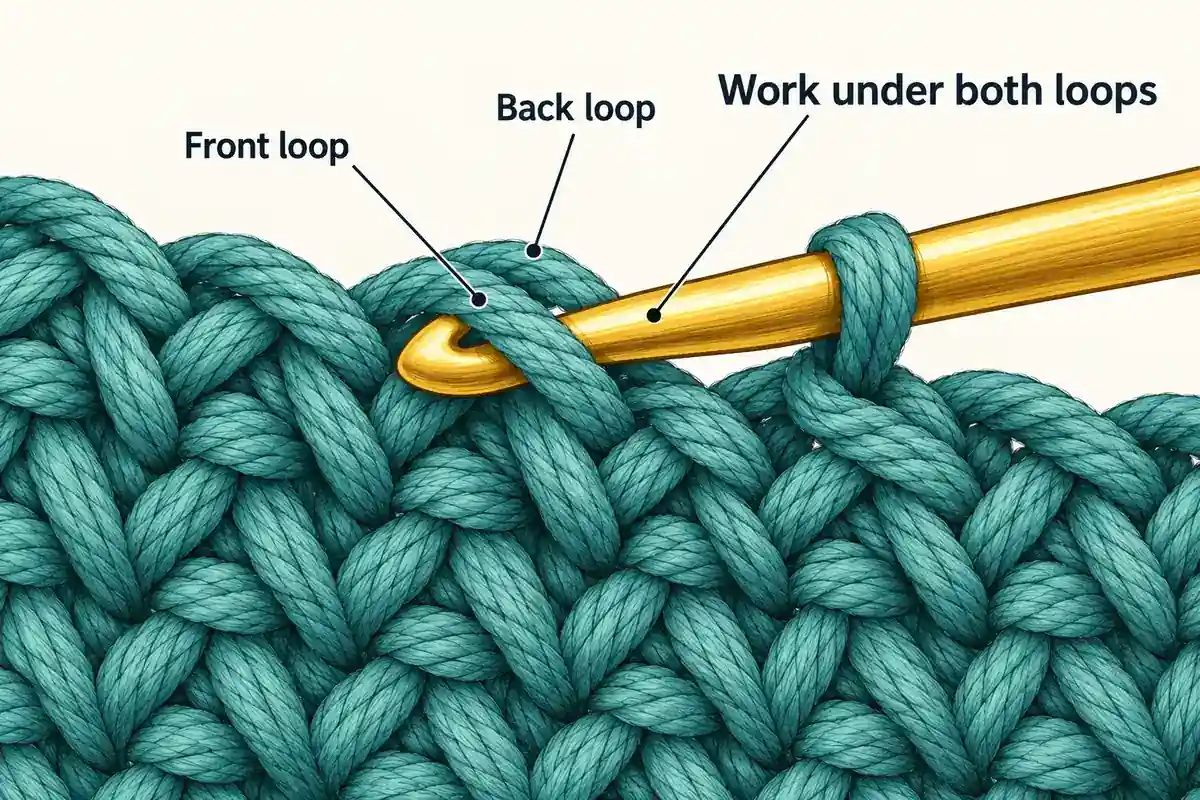
Look down at the new row’s upper edge. You should see a line of V shapes.
Each V has two strands. Together, they form the top of one stitch.
Understanding how to crochet into the next row starts with identifying these stitch tops. They sit above the foundation chain and provide the insertion points for your next stitches.
Count those stitch tops now. You need 11.
If you find it difficult to recognise each stitch, our guide on how to count crochet stitches includes labelled diagrams and a separate 10-stitch practice exercise.
How to Crochet the Second Row
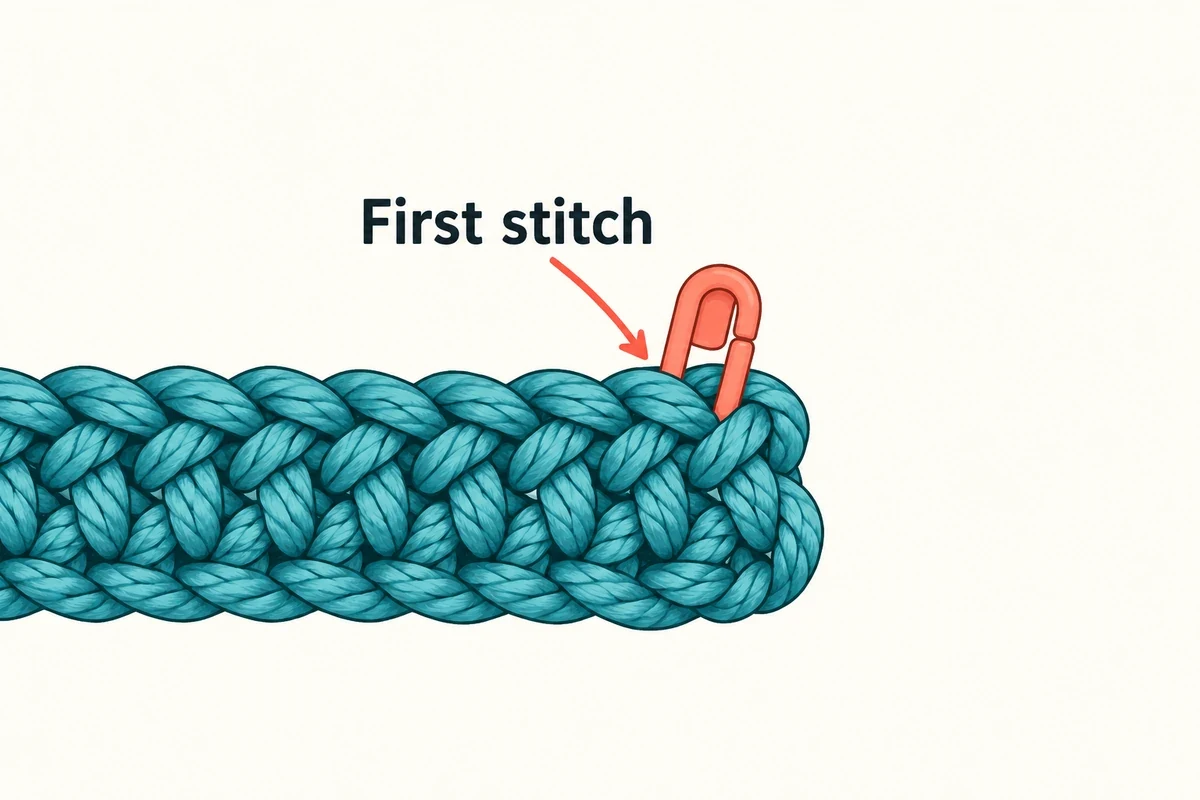
Make one chain at the edge. Keep the hook in the live loop as you turn the fabric so you can work back across it.
The marked stitch beside the hook is your starting point.
Slide the hook beneath both strands of its top V. Catch the yarn and bring a loop through the stitch. Catch the yarn again and pull it through the two loops on the hook.
Move the nearby marker into this new stitch.
Continue across the row, using both top strands at each point. The marker at the far edge shows where to make the final stitch. Move that marker up once the stitch is complete.
Count the row before going further. The target is still 11.
Turning-chain rule for this sample: The little chain made before turning is not part of the stitch count, and you do not crochet into it.
Continue Until You Have Eight Rows
Row three follows the same route as row two:
- Add one chain at the edge.
- Turn the fabric.
- Start in the stitch beside the hook.
- Use each stitch top once.
- Move the edge markers up.
Repeat this for rows four through eight.
Write down each row number as you finish it. Include the first single crochet row in your total. The starting chain does not add a separate row.
Use the crochet row counter to record completed rows; check the stitches in each row separately.
| Part | Instructions | Total |
|---|---|---|
| Starting edge | Make 12 chains. | 12 chains |
| First row | Skip the nearest chain; make one single crochet in each chain left. | 11 stitches |
| Next seven rows | Chain once, turn and work across all 11 stitch tops. | 11 stitches in every row |
When learning how to crochet this sample, focus on the edges and stitch count. No set width or height is needed.
Once you know how to crochet consistent rows, practise measuring gauge: the number of stitches and rows within a measured area. For a fitted project, compare your sample with the gauge stated in the pattern.
Secure the Last Loop
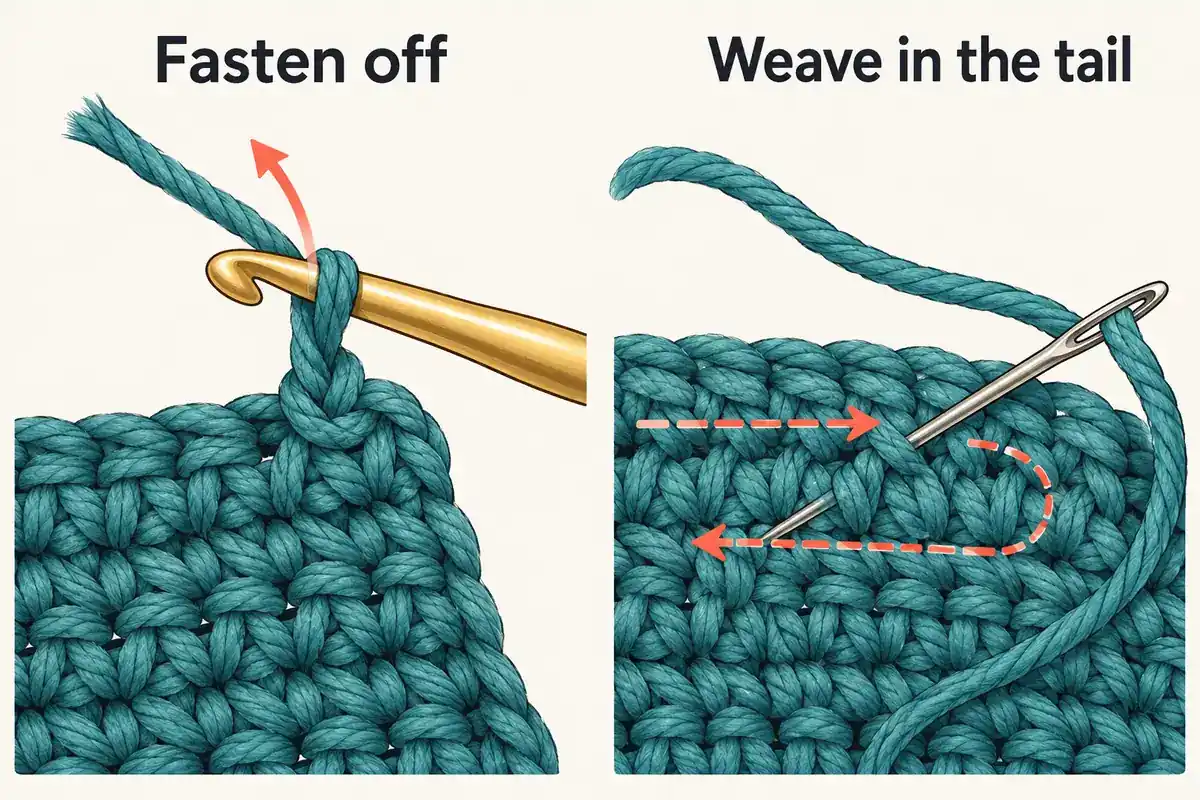
Learning how to crochet includes finishing your work securely. After row eight, cut the working yarn, leaving a six-inch tail for fastening off and weaving in.
Draw that cut end completely through the loop on your hook. Remove the hook and gently pull the end to secure it.
Put the tail through your yarn needle. Guide the needle through several stitches within the fabric, keeping it away from the outer edge where possible.
Turn back through a nearby path to help hold the tail in place. Keep the stitches relaxed so the fabric does not bunch up.
Trim the spare end. Hide the starting tail in the same way.
How to Crochet Even Edges: Common Fixes

An Edge Slopes Inwards
Stop and count. A missing first or last stitch can make each row shorter.
Use the markers to locate both ends. If a stitch was missed, undo the work to that point and replace it.
The Piece Gets Broader
An extra stitch may have slipped into the row.
Check for two stitches sharing one top V. Also check whether you used the turning chain as a stitch.
This practice piece keeps the same 11 working points from row to row.
The Hook Gets Stuck
Watch where you tighten the loop. Keep it on the straight shaft rather than pulling it snug around the thin tip.
If the foundation is too tight to use, start a fresh chain with less pull on the yarn.
Only Part of the Yarn Was Caught
A strand can split when the hook enters the yarn itself.
Back out of that stitch and try again. Check that the hook holds the full strand before drawing it through.
You Lose Your Place
Set the work down with the live loop secured by a marker.
When you return, count the stitches already made in that row. Find the next unused stitch top before you begin again.
How to Crochet: Beginner Questions
What should I practise first when learning how to crochet?
Practise a slip knot, an even foundation chain and single crochet rows. Use this lesson’s 12-chain start to make eight rows of 11 stitches. Check your count after every row before moving on.
Does the Loop on My Hook Count as a Chain or Stitch?
No. The live loop on your hook is not included in your chain or stitch count. When making the starting chain, count the completed V shapes below the hook and leave the slip knot out.
Why Do 12 Chains Make Only 11 Single Crochet Stitches?
You skip the first chain beside the hook and begin in the second chain. Working one single crochet into each remaining chain gives you 11 stitches.
Does the Turning Chain Count as a Stitch?
Not in this practice swatch. Chain one before each new row, then work your first single crochet into the first stitch of the previous row. Do not work into the turning chain. Each completed row should contain 11 single crochet stitches.
How Tight Should I Hold the Yarn?
Use enough hold to control the strand while still letting it slide. If you need to tug hard to form a loop, ease your fingers apart.
Can I Use Another Yarn Weight?
Yes, with a suitable hook. The sample will change size. Keep the same chain, stitch and row counts.
Must My First Piece Look Neat?
No. Use it to spot where your stitch size changes. A second sample gives you a useful point of comparison.
Can I learn how to crochet without buying a kit?
Yes. Smooth yarn, a matching hook, scissors, a yarn needle and two stitch markers are enough for this lesson. A packaged beginner kit is optional.
Do These Steps Teach Every Crochet Skill?
They teach a starting chain and single crochet in rows. A pattern with rounds, shaping or other stitches will need further skills.
Use Your New Skills
Before putting the sample away, check its two edges. Can you find the first and last stitch in each row? Can you follow the V shapes across the top?
Learning how to crochet includes finding your place in each row. These checks help you follow a pattern.
Next, try our guide to reading crochet patterns . It explains how short stitch names and repeats become written instructions. Keep the tutorials collection handy for your next lesson.
What should you crochet after this swatch?
- Practise straight rows: Try the free square crochet coaster pattern. It uses single crochet, with its own 21-chain start and 20-stitch rows. Follow that pattern’s materials and size guidance.
- Learn another stitch: Follow the double crochet lesson and slip-stitch lesson before starting joined rounds.
- Try a square in rounds: Use the free five-round granny square pattern to practise double crochet groups, chain spaces and corners.
For more practice, browse the basic crochet stitch lessons. Each project has its own stitch counts and starting-chain rules.